
In the previous post I anticipated the need of integrating console output with my "offline shadertoy" application, as it would probably be annoying having to switch to the terminal window all the time just to check for compilation errors. That turned out to most definitely be the case so I went ahead and implemented said feature. I looks simple but the underlying process isn't. I will break it down below.
The actual rendering scheme is just a bunch of sprites sampling from a texture atlas of pre-rendered glyphs. The glyph geometry data is obtained from a font file.
Cropped version of the actual texture atlas (as most of the space is unused at the moment).

Glyph sprites rendered with inverted opacity.

TrueType (ttf) is the most common font format, along with OpenType (otf) which is an extension to TrueType. The characters, internally referred to as "glyphs", are most often defined as contours of lines and curves which allows them to be rendered as vector graphics.
I've read ttf-files before but it's been a few years so a much needed repetition was in order. Actually, I already had done it a couple of months ago for another project. Originally I heavily referenced the STB TrueType library but this time decided to start over and rely solely on the documentation.
To ensure that font-reading and texture generation was working I wrote another application for testing individual glyphs.
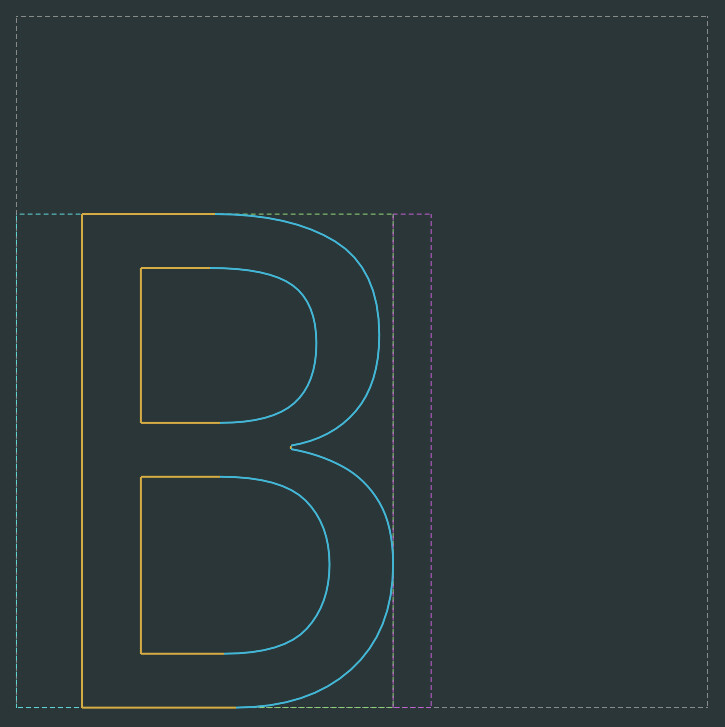
The viewer application, displaying the glyph shape along with other metrics.


I chose to render the glyphs as signed distance fields rather than as solid shapes. This allows for various effects in the fragment shader such as changing letter thickness and drawing outlines.
Anti-aliasing is also inherent. No need to take extra samples during generation.
Debug rendered distance field in the viewer program. Actual texture shown at the top right.


The glyph data read from a TrueType font is unfortunately not very usable in its current form.
A TrueType glyph consists of a number of "contours" which define the shape of the glyph. Contours are a series of "points" that define a combination of line segments and quadratic bezier curves. The winding of the contour determines whether it's a solid shape or a hole.
Points are marked as whether they're "on the curve". Two neighbouring points that are on the curve form a line segment between them. Off-curve points are control points for the bezier curves. In the case of quadratic you'd expect any off-curve point to be both preceded and followed by an on-curve point.
This is typically not the case. For connecting curve segments that form one contiguous curve, the on-curve points that connects them are omitted from the data and are meant to be read implicitly.
This is most likely and attempt at saving space as TrueType glyph data in general follows a compression scheme which makes it cumbersome to read.
So in order to generate our sprite textures we need to insert the missing points. I take the shape data I got from the ttf and generate a new shape in a different format that will be more suitable for the texture generation process.
The rendering of the individual glyph is performed on the CPU and then written to the actual GPU texture atlas.
The viewer tool displays the unpacked shape along with orientation. Green points are on-curve. Purple ones are off-curve


Glyphs are generated "on-demand" during the course of the application run. A table keeps track of the characters that have already been encountered and points to the relevant rendering parameters.
This way we're only rendering the glyphs that are actually being used. If you only care about ASCII you may as well pre-render the whole set but since I'm supporting UTF-8 that's not an option. Any character that's not covered by the font file will point to a fallback glyph, which any ttf-font must define.
Lastly we need a way to read the console output into the application, the details of which are better covered in a dedicated post. Also it's specific to Linux.
Long story short, console output is written from the application to a special "file". To be able to read from it, we need to redirect the stream to some other file that we're able to read from.
There's a system API for this so the only difficulty was finding out how to use it.
Rows are individual objects that each points to a series of "spans", that points to the actual text provided for rendering and contains style parameters such as color.
Each row defines a rectangle that encloses its contents and will be used in the layout process.
Incoming text is partitioned into rows according to line breaks. Line-wrapping is applied by rows adjusting their height to accomodate. Glyphs are laid out to fit inside the row rectangle.
Since the console area can be updated indefinitely the buffers used for storing relevant data have to be circular, meaning that the write pointer ("head") wraps back to the beginning, writing over old data.
There's also the concept of the "tail" which marks the position of the oldest data in use.
The colored horizontal bars in the video visualize the buffers and allocators used for storing text and gui components. They are as follows, from top to bottom.
The green and red markers denote the head and tail respectively.

Text styling is handled via ANSI escape sequences, since that's what the terminal supports.
Currently you can only set bold text and any of the eight non-bright foreground colors. Parsing is performed at character level as it's simple enough to not require any tokenization.
This addition was more work than expected but as usual, it was worth it.
There's a lot of interesting details that I did not cover, the major one being the actual SDF texture rendering routine, which frankly is the corner stone to this whole scheme! At some point I would like to write about that one.
That's it for now. Thank you for reading!